
Thanks so much for all the kind comments on my running in circles quilt. I had so much fun making it! It was great to start and finish a quilt in one fell swoop. It's been quite awhile since I did that. I took photos along the way so I could share a tutorial. This is June's free stash buster quilt pattern. I hope you enjoy it!

Materials Needed:
40 pieces of fabric at least 9" x 19"-a total of 5 yards (I used 36 different fabrics)
60" x 74" batting
3 1/2 yards backing fabric
1/2 yard binding fabric
Special Tools:
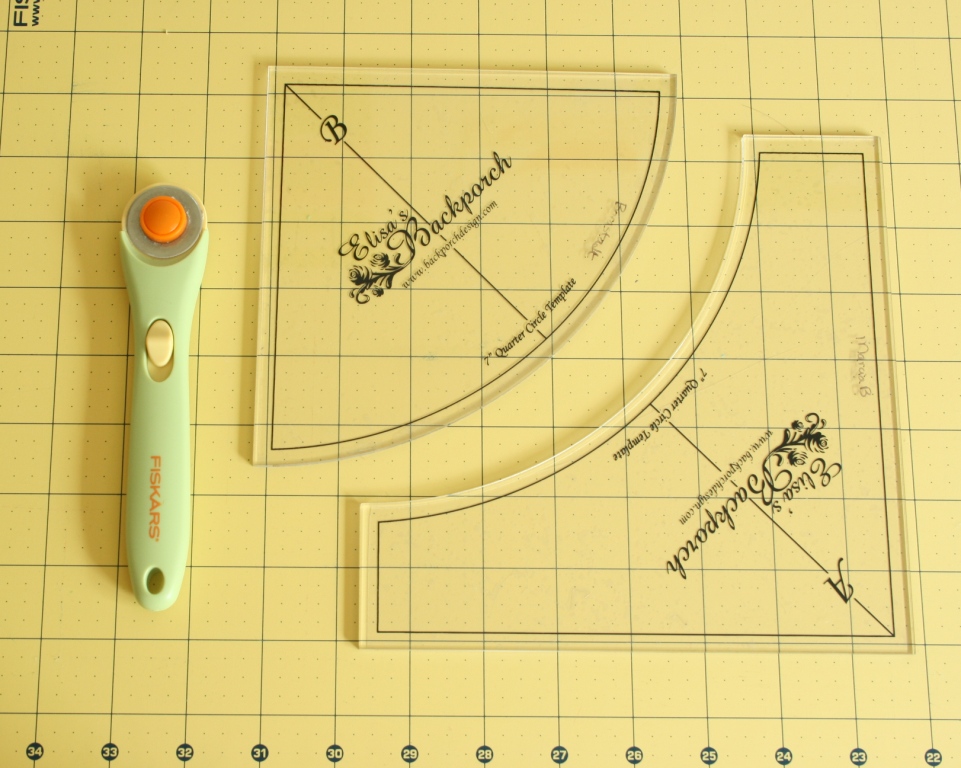
Elisa's Backporch 7" crazy curve acrylic templates A and B. (they are sold as a set) Avaliable here or here. (Or else you can google it.)
28 mm rotary cutter-this is a must! It really helps you cut the inner curves with ease.
28 mm rotary cutter-this is a must! It really helps you cut the inner curves with ease.
Optional: rotating cutting mat
Cutting:

Fold each piece of fabric in half, so you can cut 2 layers of fabric at once. I wouldn't recommend cutting more than 2 layers at once, for accuracy sake. Layout your templates on the fabric and cut carefully!


After cutting, you should have 2 pieces of the outside curve and 2 pieces of the inside curve.

Assembly:
All seam allowances are 1/4" throughout.
Take a piece of fabric from each pile and pair up ALL your fabrics before you sew. You don't have to do this, but it will help you avoid ending up with 2 pieces of the same fabric at the end. It will also help you avoid ending up with some unpleasant fabric combo in the end. I did a fair amount of matching and rematching before I sewed anything. I'm so glad I did!
Take one pair of fabrics and fold each piece in half. Cut a very small notch in the inner center of each piece. This will show you where to pin.

Match up the notches. Pin in the center. Put the smile piece on the top. :)

Pin at the top and the bottom of the block. All you need is 3 pins per block.

When pinning the top and the bottom, go up and down through the fabric twice. This helps keep the fabric in place much better than if you only put the pin through the fabric once. It's a little tip that yields great results. Try it!

This is what it looks like when it is pinned. It looks pretty funky. But it WILL come together!

Put the piece in your machine and sew slowly. Try to maintain an accurate 1/4" seam allowance.

Pull any bulk up and away from you as you sew slowly. This little tip is key! This will help ease the curves together.

Continue sewing slowly while matching up the edges of the curve as you go.

Remove from your machine and check your work. It looks pretty good! It is a bit off on the bottom, but not too much. Definitely nothing to worry about.
Don't iron anything yet!
Don't iron anything yet!

Sew all 80 pairs together first.

Layout all the blocks and take a photo (or several), arranging the blocks until the colors are evenly distributed.

Now it's time to iron! I started assembling the quilt from the bottom, so I took the two left blocks from the bottom row. For the block on the left, iron the seam toward the center.

For the block on the right, iron the seam toward the outside.
A few pressing tips:
Do a quick press with the block upside down first. This allows you to see where you are ironing. This is helpful because sometimes the curve wants to flip in the middle of the seam. Then, flip the block over, so it's right side up. I found it very helpful at this point to do a quick spritz with some spray starch. Press again.

Place the two blocks together and pin. Again, only 3 pins are needed. One at the top, one where the seams meet, and one at the bottom. Pin the one where the curved seams meet FIRST! The seams should be pressed in opposite directions, so they should nest together neatly. Starting to pin at the middle pin will help you get accurately pieced circles. If the ends are a bit off, don't worry. Those will be hidden in the seam allowances. If your ends are way off, you may consider doing some stitch ripping.

Sew the two together, and press the seam to the right. Sew the remaining blocks in the bottom row in pairs, then sew the pairs together, until all the blocks in the row are joined. Press all seams to the right. The bottom row should be complete!
For the next row up, press the seams in the opposite directions.
So, for the first two blocks in this row:
The first block's curved seam will be pressed toward the outside of the block. The second block's curved seam will be pressed toward the center. After joining those two blocks, the seams will be pressed to the left.
The diagram below will help explain what I mean. The goal is to get all the seams in the two rows pressed in opposite directions so the seams will nest and lay flat when sewn together and pressed.

It looks complicated, but really, it's not so bad!

Now that the bottom two rows are assembled, it's time to pin. Again.

Pin at each seam intersection, for accuracy sake.

I had a little bubble in this block, so I pinned in the middle of the curved piece. It will help me ease the bulk evenly in the space. If there aren't any bubbles, pinning in the middle isn't really necessary.

Sew and press. Then admire your work! It's so fun to see the circles come together.
Repeat these steps for the remaining rows. Once the pairs of rows are together (there are 5), sew together and the quilt top is complete!

The quilt top measures 56" x 70".
Baste, quilt, bind and snuggle!
You can see the completed quilt here.
I really, really hope that I've taken the fear out of piecing curves, because it's not that hard. I hope you try it and have fun with it! A huge thank you to my neighbor Marcia, for letting me use her templates AND for taking the time to teach me this method. Plus, she was kind enough to let me share all her handy dandy tips with all of you. Thanks Marcia!
Disclaimer: I realize that there are special curved piecing feet for your sewing machine. (Haven't tried them.) I also realize that there are no pinning methods. (I tried one method and hated it.) This is simply one way to piece curves, but it's worked for me beautifully. So, while this isn't the ONLY way to do it, it is the method that I would recommend. At least at this point in time. :)
If you use this tutorial to make a quilt, I'd love to see it!
Happy Monday to you!
99 comments:
Thanks for the tutorial! I might be brave enough to try a curved block now that I have some extra hints!
Deb
I want to stay home and make this quilt instantly, but alas, I must go to school . . . such an enticing tutorial.
I think you just might have taken most of the fear of circles away for me!! I've always wanted to try them, but have been a big chicken. BUK!
Thanks for the tutorial! Nicely done!
Deborah
This is a very pretty quilt! Nicely done. I have made this block before, and the curved piecing was not hard at all. Lots of quilters are a bit reluctant to try it, but my experience has been good, based on this block.
This makes it look pretty easy, it just might give me the kick to try a curved piece.
This is such a great quilt. I really need to get those templates, looks so easy to cut out.
Amanda, thank you for the tutorial! I'll print it out and save for a bit later. I love de-stashing and this will fit the bill. Just need to sort out what I want to use and maybe buy a few extra fat quarters (love them!).
Several years ago, I purchased a template set for "Drunkard's Path" blocks and they look exactly like what you showed. I made a table runner with scraps and put together various shapes. I sewed the blocks together by hand and it went together perfectly. However, I checked just now and the template set was 4". So, I'll purchase the right size and try it by machine.
Thanks again!
Karen
Thanks for the help! I love the way your quilt turned out, I may have to try it myself.
Again, thanks!
lately I have been doing a lot of curved piecing and I'm really enjoying it, which kind of surprises me. But there are so many versatile things you can do. Your quilt is awesome. i have been pinning the heck out of my blocks. I'm going to try three.
and I bought the curved piecing foot and hated it. Although it is entirely possible that I was not using it correctly. :)
Great tutorial. Thank you so much for sharing. I really love your quilt. Hugs.
Yay! Thanks for the tutorial!
Do you feel on top of the world or what? You already completed June's stash buster and it's only the 3rd. Yippee for you!
Thank you for posting this tutorial! It looked crazy scary before, but now I think I might be able to tackle it!
Thanks for all the hints. Have always been scared of curved piecing but this may be the push to get me started. It looks ace! Well done on your productivity :-)
Wonderful. Thanks for your tutorial
Thank you so much.
That is my new class, I have just started teaching it.
Makes a lovely quilt, I called it Circle of Fun as I think everyone should have fun sewing curves.
cheers
Christine
Your quilt is lovely, and thanks for the tutorial! I especially like the tip about running pins through your fabric twice. :)
awesome tips! I may give some curves a try again. Your edges lined up so perfectly!
It looks fantastic!
Thanks for posting this. It looks like such fun, even with the circles.
thank you sooo much for this tutorial. I have a bundle of fat eights that would be perfect for this!
You definitely made it look easier then most. Makes me reallllyyy want to try one! Boo for having to buy yet another ruler/template, lol
This looks like so much fun! Thank you for taking the time to put together a tutorial -- I never even thought I would attempt a circle quilt, but this looks like something I could do! :-)
Thank you for this tutorial! I love the look of circles but was too afraid to try them. I'm not anymore and once I clear out a bunch of my UFO's I'm trying this quilt.
Thank you so much for the tutorial. I will definitely make one.
Ursula
What a fun quilt. Thanks for the great Tut.
Hello ... I loved the tutorial ... explicadito and how well you've post ... is very easy .... thank you very much and kisses
Great tutorial and I love the circles! Maybe I will even try one with this easy method.
What a fabulous job on your tutorial! I've done this block before, but always pressed out. I like laying it all out before you press and then alternate so the seams nest. Learned something new!! Yay!
YAY! Thank you, I can't wait to get started!
Fantastic Tutorial! Thank you for the links for the acrylic templates, they look like the beezneez! I must get them. =)
Cheers,
Carolyn
Thanks for the great Tut. Will have to go one of thses ruler sets now.Yeh!!
Yeah! Awesome tutorial. Thanks so much for posting. I may have to ignore my pile of unfinished projects and jump rith to this one!
I have the templates. I just might try again too! Thanks!
I just started on a quilt I posted about the other day. Had to make my own templates, but I really like these you found. Thanks so much for the tutorial.
That is beautiful.
I'm sure I'll get there someday.
;)
Очень красиво!!И так доступно показано,как шить!!Молодец!!
What a great tutorial, Amanda! I so need to take my fear of curving seams. This method seems to be doable and fun! Thank you!!
Great Tutorial. I love Drunkard's Path. I don't have the acrilic templates, so I've made a card board ones but cutting with those is rather difficult.I think I'll Have to buy me ones.
lovely tutorial. you make it all look so easy and graceful. i'm going to go to bed now and dream of quilting like you :)
What a wondefur tutorial. It looks so easy that way... Thanks!
Awesome tutorial!
Thanks for the great tutorial. Now I want to know how you quilted those perfect circles.
awesome awesome awesome ...
pretty pretty pretty ....
thank you thank you thank you ... :)
This was a great tutorial. I am going to get those templates, I have shyed away from curved seams, but feel I am ready to tackle them.
Curves are on my "Need to Learn" list for this year... This may be the way I do it!
Thanks for the Tutorial, I am feeling brave.
Paul
www.OutnumberedQuilter.com
thank you so much for the tutorial! I think I'll try it .
Thank you so much for this tutorial! I think I am going to try this one. Yours is lovely.
Many thanks for this tutorial. I have been anxious to get into a circle groove. You are awesome!
I told you yesterday I loved your quilt and today I find that you've posted a tutorial. Thank you, thank you! You are such a generous woman, an sooooo creative!!!!!
You make it look and sound so easy. There are so many wonderful rulers and quilting tools on the market, so I love seeing what you used for this project. Also adore those fabrics and colors you put together. Thanks for sharing!
Amanda, you are always generously sharing your tips and techniques! Thank you for another "Got to add that to my list!" tutorial!!! See you soon.
Love the quilt! Thanks for the tutorial.
THANK YOU for posting this tutorial! It doesn't look as complicated as I thought it would be. I might actually give this a try - the trickiest part is finding the time to do it. Ugh.
Thank you for the tutorial! I am not brave enough to try this one any time soon though! lol
I love your quilt, beautiful fabrics and colors--thanks for the tutorial. I hope I can attempt one of these this summer!
The thought of curved piecing scares me a bit, but I've GOT to try this. Incredibly cute!!
Thank you so much for the tutorial. When I saw your finished quilt, I knew that I had to try and make one. I've had the templates, but was too scared to try. Your tutorial has given me the courage to try. Thanks for sharing.
cindy
I'm scared to try curved piecing, but you make it look do-able! Thank you for the tutorial! Would you let us know a little about how you picked out the fabrics for this quilt? Your selections are so awesome, but I find it hard to choose fabrics. Do you choose a certain amount of lights/darks or blues/creams/greens?
Nice tutorial! I think you explained how to piece curves very well. Love all the photos too - us visual learners appreciate pictures a lot!
I've made a "magic circle" quilt using the same piecing technique and it worked really well.
I'm getting ready to start a stash buster myself - this might make it a bit more fun!
All the best - Chris
it's lovely!!! thanks for the tips. i've ordered those tools so i can make this!! can't wait. :) i have the perfect fabric for this quilt. i've been trying to find a pattern for it and now i have it!!! very exciting!! ;)
Thank you so much, I really want to try this pattern. Your quilt looks so pretty!
Thank you! You are so generous with your talents.
Great tutorial! I'm really wanting to try this out now. Thanks for posting!
Wow. I have never loved the drunkyard´s path but I want to try this out. Now!! Could you please tell them at work that I need a few days off to try this!
Amanda
I love it and I think I can try it. With your instrutions and tips what can go wrong? Thanks, thanks again.
You sure made that look easy.......now tell us how you did the quilting :0).
the colors are really nice together too.
Happy sewing
Oh, yes, please tell us how to quilt this. I just love it.
Amazing Amanda Jean! Thanks so much for the tutorial!
That came out beautiful! I have that set of templates and have a quilt cut out but have yet to sew it together. After seeing yours, it makes me want to get started.
Although I'm not planning on making this quilt, I read your tut carefully since you included so many great tips. I hope to have a chance to play around with curves soon!
Wow, you gave us a tutorial...
I had previously posted my fear of circles & my one failed attempt at it. I am going to print out your instructions (great photos)& give it another try. I am crossing my fingers. Thank you so much for posting the how to. Clearly I am not alone when it comes to fearing circles!! Merci!!!!!
Brenda
beautiful! thanks for the virtual hand-holding!
I really love this quilt! I have those templates, only in the smaller size. I keep thinking I need to give them a go but always get side tracked. :)
I was so excited to see your tutorial and then find these templates at my local quilt shop today! I can't wait to give it a try. Thank you so much for the great tutorial!
You make the most beautiful quilts ever! Thanks for doing another wonderful scrap buster idea. I love coming to your blog for ideas. :-)
Thanks for cheering with us how you do :-) I love your quilt.
I want to thank you for your tutorial. I think I am going to try this. You did a great job, I hope mine turns out as well.
Please visit my new blog, Ric Rac and Polka Dots. I'm just starting out, but have lots of fun stuff planned to share, including quilting!
Julie
Wow, just tried the "put the pin through twice" trick for making bias tape -- what a world of difference! Thanks!
Thanks for the tutorial, I really like he idea of making a circles quilt next; this one is very pretty.
Great tutorial - love your color selection and this is first time I've seen the crazy curve template - I think I need one!!
Wow, they've turned out brilliant. I just made a few of these by hand sewing, I may have a go on the machine after seeing your tutorial. Many thanks.
I love the Drunkards Path- so I am thinking this would be a blast to make- SO cute!I love the colors you chose!
This is my next quilt! I love circles! It is just sooo darling! Can't wait!
Oh my goodness, this is darling! I found your blog from a pintrest pin, and am thrilled. You do beautiful inspirational work. Thank you so much. I cant wait to cut some fabric and sew again. It has been a while.
nicely done and nicely explained. thanks
I love your tutorial. Easy to follow. Now it's my time finding some gorgeaus fabrics like yours to make something similar to your quilt.
Patricia
Little late here but I just HAVE to comment. Since I started quilting (not that long ago...LOL) I wanted to have a hexagon quilt. Well, yeah, looking into it, well, it just seemed like too much work and, quite frankly, too advanced for me...I saw this tutorial(when you first posted it) and thought it was very cool. Might even try it someday. Apparently it was gelling in my brain, because a light bulb went ON today. I whipped out some scrap fabric, cut 7 3 inch hexies, put a center and one side together...then applied your pinning and sewing and within minutes I had a full hexagon flower!!! You rock! This is a fantastic find for me. THANK YOU!!!
OK, This is going to be long (I typed it once before and cyberspace ate it...the nerve!!) I really want to say thank you for the inspiration. A long time ago (OK, not that long ago) I started quilting. I saw (and fell in love with)a hexagon Grandma's Garden, Flowers, etc...important part. Loved the hexies. Did a little looking around. Yeah, nowhere near enough skill (or patience) here to do that.Still it lived as a one of these days kinda hope and dream...I read this tutorial when you posted it and thought is was very cool, with awesome results...Then this afternoon I was thinking about hexies again, and WOW the light bulb went ON! I remembered this tutorial, and promptly grabbed a bunch of scrap fabics and got to cutting, pinning and sewing. In a very short time I had a hexie flower!! So, once again, THANK YOU!! You are awesome!!
Thank you so much for this tutorial. I would never have even thought to try this design without having seen it on your blog. Great job!
This is a very beautiful quilt. Good job.
You make it look so easy!! I almost feel like I could make it!! ;)
I am having a problem with puckers when sewing the two curved pieces together. On the pieces that have no puckers, then I have extra of the smile shaped piece. any ideas- thanks!
I'm not a "circle" person -- this talent seems to evade me - however,after reviewing this tutorial I may give it another try -- thank you soooooooooooo much :)
THANK YOU for this CRYSTAL CLEAR tutorial!! I've been a CHIMP about this block for a few years now. I've GOT IT NOW! Thanks!
What a beautiful quilt! Thanks for sharing.
Love this. Can't wait to try it on a table runner.
Will try this with one of the many layer cakes I have.
Post a Comment