A few weeks ago I bound a set of
5 coasters. Joining the ends of the binding strips is pretty tricky on pieces that small, but I figured out a way to make it easier! I recently bound this mini tree block, which measures 5.5" x 8". That's pretty little! I took a few photos along the way so I could share a quick tutorial on how to bind tiny things with you. Use this method for coasters, pot holders, mini mats, mug rugs, or teeny tiny quilts...anything
small.
Start with a quilted piece.
Trim the edges down to between 1/16" and 1/8" beyond the quilt top.
Cut a strip for binding 1 1/2" wide and a few inches longer than the perimeter of your quilted piece.
Lay out the binding on the quilted piece as sort of a "dry run", if you will. Make sure to miter the corners as you go, laying out the strip as accurately as possible.
Measure an overlap of 1/4". Trim the excess. Normally, when binding and joining the ends with a straight seam, you would measure a 1/2" overlap. But, in my experience using this method, I've found that during the process of stitching the binding down, things stretch just a little bit. The 1/4" overlap was spot on
for me, but your sewing machine/walking foot may vary from mine, so your results may vary a bit as well. Use the 1/4" overlap is a starting point. Adjust if necessary. (I'd be curious to hear how it works for you. If you try it, leave me a comment please!) Ok, now that that disclaimer is out of the way, let's proceed!
Take the two ends of the binding strip and sew them together with a 1/4" seam allowance. Make sure that the strip isn't twisted.
Now, you should have a continuous loop of binding. Press the seam open.
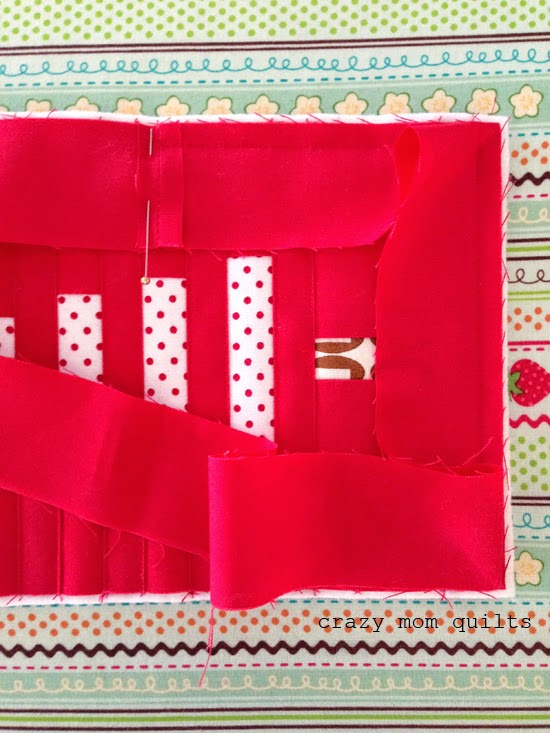
Place the seam on the side of the quilted piece (so it doesn't end up in a corner) and start stitching it down. The beautiful part is that you don't need to leave any tails for joining later. That part is already done!
Attach the binding to the quilted piece as you would normally, mitering the corners as usual.
At this point, all but the final corner (top right) has been stitched down.
Take the piece to the iron and press the binding strip flat. Pin in place. See? No pucker in the binding whatsoever. Stitch the remaining part down, overlapping a few stitches where the seams meet.
And here it is, all attached! Isn't that slick?
Press the binding away from the front of the quilt. (it's not easy on a tiny piece!)
The binding will stand almost straight up.
Fold the raw edge in, then fold the binding over itself, completely enclosing the raw edges inside.
Hold in place using some handy dandy Clover wonder clips. (I LOVE them!)
Hand stitch the binding down on the back. This part is great, because it goes so quick!
Here it is, all finished!
If you have any questions, I'll try to answer them in the comments.
Go forth and bind ALL the tiny things!


54 comments:
Love this way to bind small things. Got to try this. Thanks.
Clever!
Thank you! I struggle with binding coasters and will definitely try this next time!
Thanks for this great tutorial! I will be trying it soon.
Wow, I love this! I just made 6 coasters for my daughter and binding was not fun. Your technique will definitely be what I use next time! And, luckily, my husband has requested both coasters and a mug rug, so I'll have an excuse to try it out soon.
This. Is. Brilliant.
P.S. I also love your tree!
Aww perfect!! Am about to make a bunch of potholders as gifts and this is EXACTLY what I needed :-) Thanks Amanda Jean :-)
Thanks for a great tutorial! Can't wait to try this on my potholder gifts!
Thank you! I'm still struggling with getting the corners perfectly miteted, but this will help with the rest on those tiny things!
Thank you. Have been trying to figure this out for coasters for xmas. Can't wait to try
Tiny trees and tiny binding---great big finish.
This is SO timely - and awesome - thank you! I have to bind 6 3" Christmas Tree ornaments this weekend!! o:)
So Brilliant! Love it!
Ah! Bless you, my dear! Joining the ends on the many potholders I make has always been a source of frustration. I cannot wait to try this out - thank you!
I just might need to make something small to try out this method. Thanks for sharing.
This is brilliant!! I quilt up my orphan blocks to use as pot holders, etc. and even those sizes are a pain for joining the binding ends. I am definitely going to try your method on the next ones I bind. Thank you for sharing!!
Great tutorial! Perfect for all those little projects in progress right now. Thanks and a happy holiday to you and yours.
Brilliant in its simplicity! I am thinking, why didn't I think of that!! Thank you for sharing, I'll be using your method for the hot pads I have left to bind.
Carole @ From My Carolina Home
Nice!! I just finished some coasters and this would have been fun to try out. Next time, for sure.
You are just too clever! Can't wait to give it a try.
Thank you Amanda Jean! Talk about timely, I had just finished a mug rug and this technique worked beautifully!!
Thank you, thank you for this tutorial. It didn't matter how I 'held my tongue' - sewing those end pieces was a job and a half. Can't wait to try it your way!!
This is GENIUS!!!! Thank you for sharing.
What kind of iron do you have? I've tried googling Perm-Press but just get a generic response. I love how stout it is. Thanks!
great tricks! I can't wait to make some mug rugs!
Love it! Thanks for the great tutorial (as usual!).
I wish you would have posted this two days ago when I was binding a pot holder. Thanks for a great tutorial.
Great idea! I'll have to give it a try.
I must give this a try. Thanks so much for the tutorial.
Love your tiny tree quilt and thanks for the binding tip :)
Thanks for sharing! Awesome tutorial!
Gah! You must have heard me swearing last week trying to bind a name badge lol ... I'll give this a try next time, thank you :)
what seam allowance are you using when you stitch the binding on? Also, are you lining it up with the cut edge or the edge of the fabric top? Thanks.
Great tutorial! Thanks for sharing your hard work with us!! Merry Christmas!
"BIND ALL THE TINY THINGS!" bwahahahaha.....
what a great idea!! cant wait to try it this way. :)
Thanks for sharing this little binding tutorial. I would not have thought to do a small piece this way.
Brilliant, just used this method the 1/4 inch worked perfectly thank you
This is so good. I'll probably still have to work on my miters, though. Sigh.
Genius!!
Woah thank you for this instructional. I am looking for a way to make coasters for Christmas presents. My daughter would love some coasters.
http://www.quiltypleasures.ca/
You couldn't have posted this at a better time. I quilted 30 mug rugs and couldn't finish even one with a French fold binding. Thank you!
I could have used this on the mini I made yesterday. I found the binding the most annoying part, and least successful.
I was hoping you would do a tutorial on this! You are so very clever! Thanks for sharing😄
Great tutorial! Thanks for sharing.
Perfect timing. I have 3 pot holders to bind for Christmas!
awesome!
I just love your quilt! Supercute!
Thank you for the binding tute. I will be using your method in about 15 minutes.
Yes, this is so simple to understand. Thanks!
just tried it and 1/4 is even too much -- however, it works great. The second one I did by matching it up -- still a little too much but I'll get it perfect soon!
Given it a try and worked perfectly first time! Thank you.
Didn't read all the comments, so this have been said. You could try using a small traveling iron to iron the binding back on this small puppy. It's a beautiful piece!
Post a Comment