Monday, July 09, 2012

oatmeal quilt

 I finished my oatmeal quilt top.
Again.
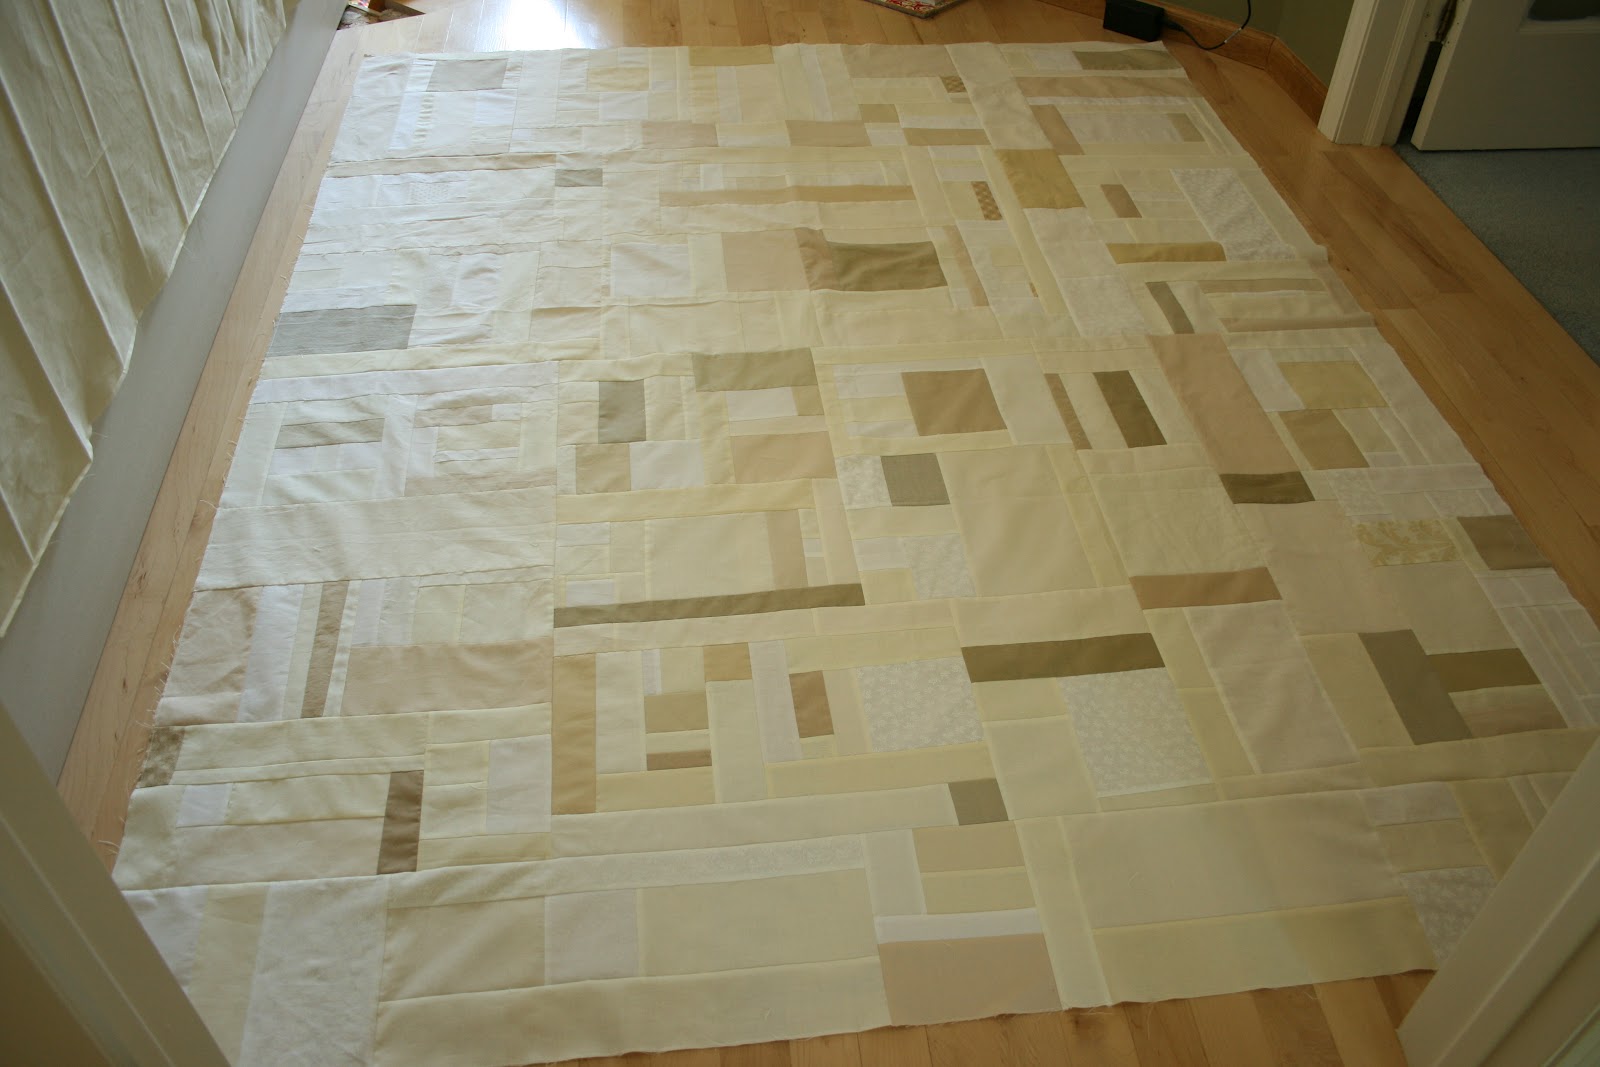
I thought I was done with the top a few months ago when it measured about 62" x 72" or so. I was going to baste it, but when I pulled out the quilt top it felt a little too square. I wanted to add more to the front, but I had given most of my neutral scraps to Tara. So what's a girl to do?
I decided to piece the back to make more scraps so I would have more to add to the front. (I. am. crazy.) Actually, it worked out quite well! Having the back made helped me know when to stop adding to the front. Otherwise I could see myself getting sucked into a vicious cycle and ending up with a king size quilt. Or something that would cover half of my neighborhood.
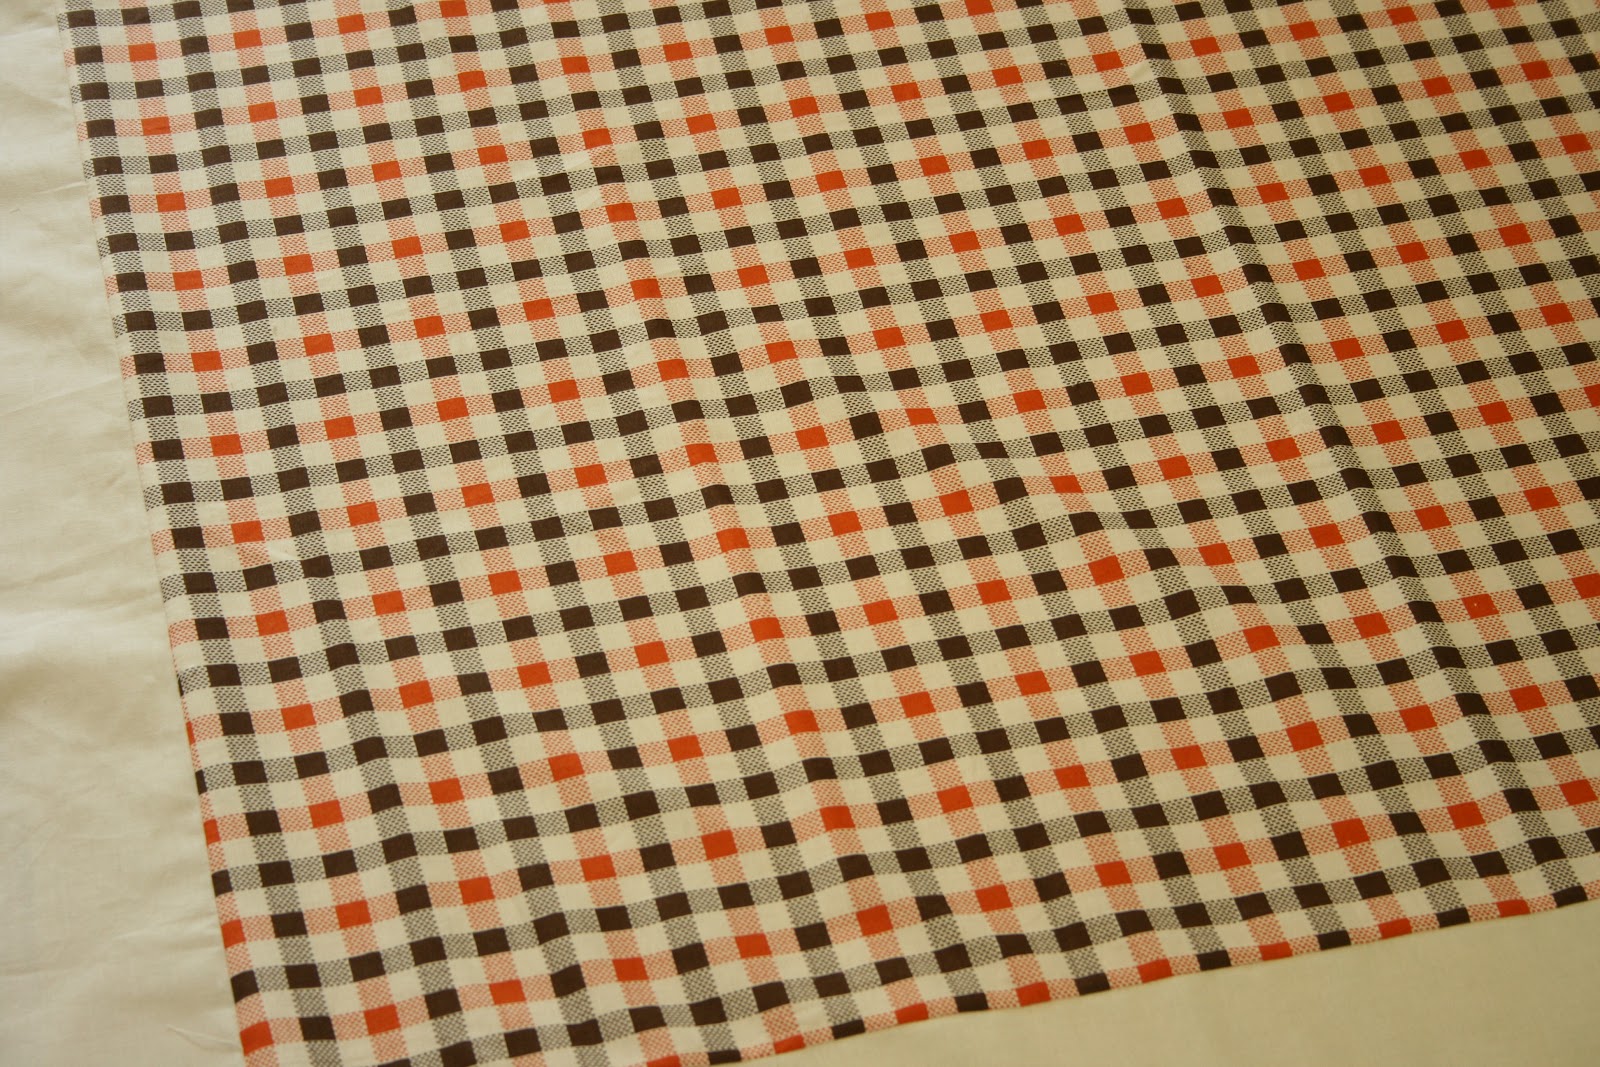
This backing focus fabric is quite funky, I'll admit. I must have been under the influence of Denyse when I bought it. It was right after I had read and absorbed her new book. She can use the most funky (and even ugly) fabric and make it look so good! When I asked Tara what she thought about the plaid fabric, she said it reminded her of 70's leisure suit. Doh! I didn't realize it was THAT bad. But I still loved the fabric for some reason and used it on the back. I'm so glad I did.
This past weekend I was able to quilt it up while I was at the Gruber's quilt retreat. I love how the quilting turned out! I just did rows of e's across the entire quilt. Time consuming, but easy and a great match for the quilt. Now it just needs binding! I'm anxious to get this one finished!
Speaking of the retreat....I'm so thankful that I got to go and sew for the entire weekend! It's my yearly vacation and birthday present all rolled into one. It was so, so good to be able to sew, eat, chat, laugh, shop and spend time with blog friends. This year our group was (back row, L to R) Doris, Michelle, Rene, Terri, Mary, (front row) Cindy, myself and Stephanie. We stayed up way too late and got up way too early so we could sew, sew and sew some more. It was amazing. It was good to go, but it's good to be home, too. Just the way a vacation should be.

Now, I had better get busy. I've got lots of new fabric to sew up! Oh, yeah, and a quilt to finish, too.

Sunday, July 08, 2012

scrappy Sundays-managing it all

Welcome to scrappy Sundays! Today Cheryl and I wanted to talk about how we wrote the book while managing everything else. You know, running the house, the family, the normal chores. When you sign a book contract the whole world doesn't stop. The kids still need three meals a day, the husband still has to work out of town, the house certainly doesn't clean itself. Kids still get sick. So, how do you manage all that while meeting the deadlines? Not that I have it all together, mind you, (I sooooooooo don't!) but I do have a few thoughts to share about the experience.
When we were writing and quilting for the book there was always a lot to do, but it was easier in some ways than normal. The reason? Because we had very defined goals. We knew what we needed to do and we knew when it was due. Then we just did it. (Heh. That might be a gross understatement.) But, looking back, I see that having the focus really helped me. Normally the possibilities of the what I could work on blow my mind. Overwhelmed much? Yes, that's me. So having the defined list of what we had to do was actually a relief.
Having a co-author was a definite plus. It was great to write with Cheryl for several reasons. First off, she's a darn good writer and quilter. It was very helpful that we each made several of the quilts in the book. I can not imagine trying to make 15 scrap quilts in a 6 month time frame all on my own. (oh. my! scrap quilts can take a long time.) Our quilts were better because of our tag team efforts, too. We pushed and challenged each other in just the right way. I even added purple into the Gumdrops quilt, for crying out loud. That's big! (I'm so not a fan of purple.) It was great to have a friend that was always as interested in the book as I was. My husband still got an earful once in awhile, sure, but it sure saved him quite a bit of hassle.
As far as the day to day logistics....I normally quilt a lot. I know, what a surprise! But during the book process I did quilt more than normal. I squeezed in extra quilting time before the kids went to school, after the kids went to bed, for a few hours in the middle of the night when I wasn't sleeping anyway. (Thankfully that was only an occasional occurrence.) My youngest daughter was still at home because she hadn't started kindergarten yet, so she watched PBS kids on a daily basis. In fact, Cheryl and I often joked that when we were done we should probably send PBS a sizable donation for helping us through. Ha! Some days there was more TV watching than others, but we still limited it. Thankfully my daughter is pretty good at independent play. When she needed some company she would join me in the craft room and play with some scraps or design her own quilt. There were always plenty of scraps to go around. :) Having her at home during the day forced me to take more breaks than I would if she wasn't, but that's a good thing. Otherwise I tend to get so wrapped up in my work that I eat lunch at 3 in the afternoon. She helped me stick to a schedule.
I recall asking a friend once who had raised 5 kids (the youngest two are twins) how she managed it when they were younger. Her response was "you just do it". I feel like I would have the same answer with the book. Looking back on it, knowing all the crazy life situations that were going on in the midst of it, you look back and realize, we just did it. And that's that.
The photos shown throughout this post are mini quilts that I made to thank my wonderful pattern testers. Some are mini versions of quilts in the book and some of them were designs that I thought suited my friends' tastes. It only took me a year plus after writing the book to get them made, labeled and mailed. A great example of why I think deadlines and focus are so very helpful. :)

Thursday, July 05, 2012

winners

Thanks to all of you for entering the giveaway!
The winner of the book is Berta.

The winner of the digital book is Hope.

The solid scraps and the strings will be going to Jen in New York City (looking glass knits) and Diann is the winner of the ticker tape pieces and the green scraps.

Thanks for all your comments. It was fun to read your thoughts on scraps!

Sunday, July 01, 2012

scrappy Sunday-giveaway day!

Welcome to scrappy Sunday! Because it's a holiday in Canada and it's a holiday later this week in the US, (plus my birthday in a few days!) Cheryl and I decided that it would be a great time have a giveaway!

Up for grabs today....
A copy of our book, signed by both Cheryl and myself, to be sent to someone in the US.

A digital copy of our book to be sent to someone outside of the US.
A scrap pack of various solids in cool colors.
A scrap pack of strings.
A scrap pack of ticker tape pieces. (My favorite!)
And a scrap pack of green fabric...perfect for making slabs.
In your comment, I'd love to hear where you live and your thoughts on scraps. What do you love about working with scraps? Or....What do you find challenging about working with scraps? Or you could answer both! Winners will be chosen on Thursday, July 5th.

Be sure to check out Cheryl's post and enter her giveaway, too! 

Saturday, June 30, 2012

big, big bento

It seems silly to make a Christmas quilt in the middle of a heat wave, but that's exactly what I did. I certainly don't need another Christmas quilt, but this fabric is waaaaay too good to pass up! I love that there is ORANGE in the line...so FUN!
Pattern: A twist on the bento box pattern
Fabric: Technicolor Tidings by Connecting Threads
Size: 72" square

I must really love the bento box pattern, as this is my third variation. You can see the first one here and the second one here. I LOVE all of them that I've made, but this might just be my favorite yet!

Sunday, June 24, 2012

scrappy Sundays-our pattern testers

Cheryl and I had fantastic pattern testers for Sunday Morning Quilts. Today we want to feature their work because they are awesome, they did amazing work, and they helped us out so much!

I love seeing patterns sewn up in different colorways. Furthermore, I love to see how someone else uses a pattern and runs with it. It is so. much. fun. (It's especially fun when it is your pattern!) I hope you enjoy reading the stories behind their quilts, too.
Andrea tested the splash quilt. She posted about her quilt here.

Katherine tested the candy coated pattern. She posted about her quilt here.

Pam tested the high five pattern. She posted about her quilt here.

Pauline tested the up, up and away pattern. She posted about her quilt here.

Tara tested the gumdrop pattern and made these throw pillows. She posted about them here.

Terri tested the Scrapper's Delight pattern. These are her test blocks....destined to be a huge throw pillow. Beyond being a pattern tester, she was very generous to share her scraps with me. Several of the scraps in Scrapper's Delight came from her. She has the BEST scraps! In fact, her and I have done a good deal of swapping. I trade fabric from my stash for her scraps. It's a great deal for both of us! :)
Terri also made a version of the storage box pattern from the book using some of her treasured chocolate lollipop scraps. You can read her post about both here.

I'd like to say a BIG thank you to all the wonderful pattern testers! You ladies did beautiful work!

In the book we have a section called "make it yours" to accompany each quilt. We wanted to suggest alternate ideas for each quilt because we know that scrap quilts can never be replicated exactly. The goal is to enable you to use your very own scrap collection and put your own twist on each design. We want you to make a quilt that you will use, love and be proud of...all while reducing your scrap pile. So, go forth and "make it yours"!  :)

Saturday, June 23, 2012

my online friendship quilt

I've met some great friends, all because of this little blog. Friends that I would not have met otherwise. It's incredible to stop and think about it and I'm so thankful! It's because of a few of those friends that this quilt came to be (as I wrote about in this post).
Isn't it gorgeous?!??! I am absolutely smitten with this quilt! It's got such a variety of colors and prints. It's truly scrappy, which I love. I could make a hundred quilts like this!
Thankfully my friends buy dark value fabrics. I would say that most-if not all-of the fabrics I contributed were light or medium values. The darks really pop! I need to start being intentional about adding more dark fabrics to my stash and then using them. They add so much depth, so much interest to a quilt.
For the back I used this LOVELY fabric (Picnic Rose from the Darla line by Tanya Whelan) that I was saving for just the right quilt. I had bought 5 yards of it last summer because I loved it and I got a screamin' deal on it. I knew I would put it to good use at some point. There wasn't quite enough for this quilt, so I patched in a scrappy pink stripe right down the middle. It added just the right length for the backing. An added bonus, I didn't have to worry about lining up the repeat in the fabric. Hurray!
For the binding I used a black and white stripe, a la Rita. Tara and I found this when we were shopping together last February at Mill End. We called it 'Rita binding' immediately and we bought the rest of the bolt, then split it. (It is made by Cranston Village Quilt Works.) I didn't know if I would actually use it on a quilt, although I hoped to when I purchased it. I don't use a lot of black and white fabric in my quilts (or any, usually), so it was a stretch for me. Once I decided I was going to use the black and white stripe for the binding, it prompted me to add some black and white prints into the patchwork mix as well. I'm very pleased with the results!
The striped binding adds so much, even to the back of the quilt. 
I'm happy to say I had great success with my concentric amoeba quilting. It was fun to do, went fairly quickly and it gives the quilt lovely texture and movement. I'm planning to do more of this quilting design...it's definitely a keeper!

The quilt measures 64" x 88", a perfect twin size.

Thursday, June 21, 2012

how to bury knots when machine quilting

Due to several requests, I decided to write up a little tutorial on how to bury your knots when machine quilting. I've only been doing this for two weeks, but I do love how tidy it looks and how beautifully finished the starts and stops are. Here's one way to do it.


To start, thread your machine and pull your bobbin thread up. Pull both threads to the side.
Insert your fabric sandwich.
Insert the needle into your quilt sandwich. Your presser foot should be up at this time.
Now, you want to pull the bobbin thread up and through to the top of your fabric. To do this, put the needle down and bring it back up. Turn the wheel on the side of your machine back and forth by hand a bit while gently tugging on the top thread until you see a loop appear.
Use a stitch ripper to catch the loop and pull the end through to the top.
 Both threads should be on top of your quilt sandwich at this point.
Put the needle down into the quilt sandwich in the same exact spot that you pulled the bobbin thread through. Hold both threads to the side, put your presser foot down and start quilting.
 Once you are a few inches away from the starting point, you should have enough room to bury your knot.
 Tie a small knot using both of the thread tails.
Thread your tails onto a needle (a self threading needle works very well) and insert the needle into the same hole where the knot is, or just behind it.
Run the needle inside the layers of your quilt sandwich. It is a good idea to double check the back side to make sure your threads aren't visible there. Push the needle to the front of your quilt about an inch away from your starting point.
Pull your thread ends through and give them a gentle tug. Make sure the knot pops below the surface of the fabric. Use a scissors to trim the tails.
 Your starting point should look neat and tidy on both the front and the back! Isn't that slick?

That's all fine and well...but what do you do when you run out of bobbin in the middle of a quilt and you don't have much of a thread tail to work with? The photo below shows this. There is only about 1" of thread left.
In this instance, I like to flip my quilt over and work from the back side of the quilt. There is only about 1" of thread there, too.
So, I use my stitch ripper and gently take out a few stitches-just enough to give me some decent thread tails to work with.
Tie a knot. (You will notice that I had to tie the knot just above the thread on the right...you don't want to tie it off in the middle of the two threads or the knot will sit right on top of the fabric and it will be hard to bury.)
Thread the needle....
and once again, insert it through the same hole that your knot is coming from.
Run the threads through the layers and to the side a bit. Give the threads a tug until the knot disappears under the surface of the fabric. Trim the ends. The knot should be completely hidden. To start quilting again, flip the quilt over and begin in the very same stitch where you ended. Hurray for seamless starts and stops!

I hope that all makes sense! If you give it a try, I'd love to hear about it. If you have any questions, I'll try to answer them in the comments.