Friday, December 29, 2017

Maine socks and stash organization

Welcome to finish it up Friday!
This week I managed to finish another pair of socks! I bought this yarn in August when my husband and I went to Maine to celebrate our 20th anniversary. As much as I LOVE colorful socks, this black and white self-striping yarn caught my eye because it's so practical. These socks will match 90% of my closet. :) I'm pretty pleased with how well those stripes lines up. Not exactly perfect, but pretty darn close. Hurray!
 
This is my 23rd pair of hand knit socks that I've made to date. You can find the free pattern here.
 
The other BIG project this week was to organize my stash. It was in quite a state of disarray, so I spent quite a bit of time folding, organizing and rearranging. It felt AMAZING to get this all in order.
I've used the same folding technique for my stash for years and I can't recommend it enough. (See this post.) If the fabric is not large enough to wrap around a 6" ruler, it goes into the scrap bin. Having a consistent folding technique helps maintain the organization long term.
Lest you think that everything is perfectly perfect over here, this is was hanging out just out of the frame of the previous photo. (See? I AM a normal quilter and a real person. Hahahaha!)
I shuffled the piles a little farther out so I could get a decent picture of the whole corner. I have a bunch of scraps that I need to get in order next, but one step at a time....right? It feels good to have the stash neat and tidy, at least.
 
Ok, that's it for me today! Now it's your turn to link up your finishes. Thanks, as always for joining me for finish it up Friday!


Friday, December 22, 2017

a sew together bag for Emily

Welcome to finish it up Friday!

I'm happy to share another finish with you today! I made this sew together bag (pattern here) for my friend Emily as part of a Christmas swap between some good friends.
Emily likes gray, aqua and hexagons, so I combined all of those things in this little bag. I have to admit that this took a lot longer to make than I was anticipating, but she loves it, so it was totally worth it. The hexagons were English Paper Pieced, which means they were basted and then stitched together...all by hand. I did enjoy making the EPP panel and then using it for a bag exterior. I did not enjoy cutting through the hand stitches when I had to trim the panel down. That was nerve wracking! Thankfully I measured right the first time.
This is the second time that I finished the binding by hand on a sew together bag and I'm sold on the neat and tidy results.
If you are attempting to sew this bag, I would highly recommend adding zipper tabs (see this post) as a modification to the pattern. It makes sewing up the sides so much easier. As you can see, I enjoyed selecting a lot of different fabrics for the interior. I have plenty of aqua in the stash to choose from. Hurray!
This is my 7th sew together bag that I've made to date! I have one more to make before I put this pattern on hold again for awhile. They sure do make great gifts!
As a little extra for the swap package, I made Emily this little coffee ornament. You can find the free pattern here. I used coffee beans for a filling, so it has a wonderful coffee aroma. I thought that was pretty fun.
 
Well, that's it for me today! Do you have a finish to share? If so, please link up. Thank you for joining me for finish it up Friday! I hope you all have a Merry Christmas!

Tuesday, December 19, 2017

related WIPs and glamp stitchalot

This quilt was in time out for a few weeks/months (?) because I couldn't get the color break quite right. A few weeks ago I had a friend help me figure it out, so sewing has commenced. I'm pretty excited to see it come together! When sewing the rows together, I pin at each intersection, so it takes awhile. I decided that I'm going to enjoy the process rather than to rush through. (What a concept, right?) You can see an in-progress layout here, if you care to take a peek. This is 1/4 of the quilt top. I'll take any progress I can get. :)
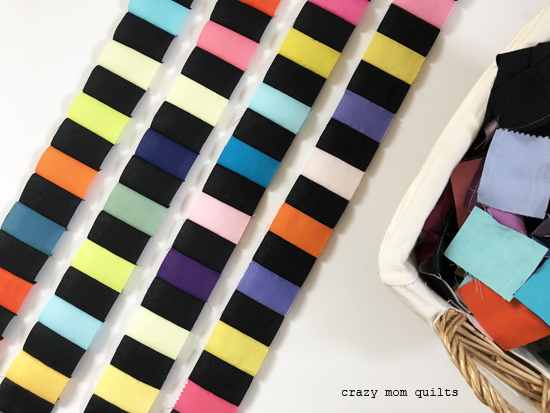
When I was cutting out all 1000+ squares needed for the quilt above, I noticed I had a lot of fabric left that measured at least 2" x 2 1/2". So....I started cutting rectangles into that size. Initially I thought I would pair them with a white background, because that seems to be my default.
However, I decided to challenge myself to break out of my comfort zone and use a black background instead. I have a lot of black scraps in my scrap bin, so it seemed to make sense. I like how the colors POP against the black background. They seem to glow!
I've been using this as a leaders/enders project, which is another thing that is out of my comfort zone, but it's getting easier as I practice it. I'm excited to be putting these scraps to good use. Woohoo!

I wanted to share with you an exciting announcement today, too! On November 8-10, 2018, I will be one of four teachers that will be at Glamp Stitchalot, which is held in Ann Arbor, Michigan. I'll be teaching improv string piecing classes. You can find more details here. I'm super excited and I think it will be a lot of fun!

That's it for me today! I hope your week is off to a great start!

Friday, December 15, 2017

tea pouches

Welcome to finish it up Friday!

I have a small finish today, but it's a finish nonetheless! Considering this crazy time of year, I'll take it! :)
I made these handy fold-up pouches to give to a few of my friends that enjoy drinking tea. They were a fun little project and I can see several more in my sewing future. It's fun to mix and match different fabric combinations. Picking the fabric takes almost as long as sewing them up. I'm not complaining, though...I love playing with fabric!
The pattern is called Handy Fold-Up Pouch and it comes from the book Stitched Sewing Organizers by Aneela Hoey. It's a beautiful book filled with several practical projects that I would love to make someday.
Have you heard of the hot ruler? I used it when I was making this pouch and it's SO handy. My friend Tara gave me this gadget when I was expressing (complaining?) how hard it is to hem pants or dresses accurately. The ruler is heat resistant, so you measure, fold and press the fabric all in one step. It's SLICK! I've used it for hemming, but also for small projects like this.
This is in no way sponsored by Clover or anyone else, it's just a wonderful tool that might make a good gift for you or for a sewing friend. Or both! :)
Of course this pouch would make a super cute mini sewing kit, too! That's kind of what it was designed for. hahaha! I love that you can clip the wonder clips (another great tool!) on the band. I think I might try adding a snap on the flap and use that as an alternate closure. Wouldn't that be cute?

Alright! That's it for me today! I hope you have a finish that you can share. (I know that it's so hard this time of year, because there is a lot of secret sewing going on!) Please link up, and thanks, as always, for joining me for finish it up Friday! Have a great weekend!

Wednesday, December 13, 2017

a little of everything

I've been walking around my house singing "it's the MOST wonderful time of the year", but in a slightly sarcastic manner. I just can't seem to keep up! I know I'm not alone, but I still don't care for the ridiculous pace of early to mid December. This post is a little random, so please bear with me! :)
Thank you so much for the sweet comments on my gingham quilt! I had a few requests to see the pillows a little better, so here you go. I made pillowcases with Lotta dots in Coral, the chenille pillow shams were made from an old bedspread and the kindness pillow was finished earlier this year. I love the simplicity of the whole ensemble. It makes me smile every time I walk into my room! It's wonderful to have new bedding to brighten up the dreary winter days.

I've been working on a lot of different things this week...
I started knitting an origami top hat for a friend. I LOVE this shockingly pink yarn. It's been a great project to work on while I'm on the go.
This panel of hexies is part of a larger project that I will share more of soon. I estimated that it's taken me between 12 and 16 hours JUST to sew the hexagons together. Sometimes it's better NOT to count the hours. Hahaha! It did force me to just sit down for awhile, AND they are super cute, so it was totally worth it!
My neighbor ordered a pincushion to give as a gift, so I made one for her as well. I had a blast making these from my teeny tiny scraps.
And, I had to make an extra one, just for good measure. It felt so good to finish SOMETHING! Playing with scraps and finishing a few small projects was just the boost I needed to keep going.
 
I hope you are able to find a few moments in this busy time of year to breathe and enjoy the little things, too!

Friday, December 08, 2017

gingham quilt complete

Welcome to finish it up Friday!
Last Saturday evening I finished my gingham quilt!!!! I waited until I completed the coordinating pillowcases (all 6 of them!) to put the quilt on the bed. Otherwise I would procrastinate for at a least a year or two to actually sew them up. Ha! I put everything on my bed last night and I'm soooo pleased with how it all came together!
The quilt uses only 5 fabrics: White, Pink Flamingo and Pearl pink (all Konas) for the top. The binding (lotta dots in coral reef) and backing (apron in coral reef) fabrics are from Connecting Threads. That coral color is super hard to photograph, but trust me, it's really pretty!
It was pretty fun to back an entire quilt with my fabric. :) This is my largest quilt to date, finishing at about 108" x 102". I'm very happy that this quilt, which features the Kona color of the year, is actually finished before the year is over. Woohoo!

Now it's your turn! Please link up your finishes for the week. Thank you, as always, for joining me for finish it up Friday! Have a great weekend!

Wednesday, December 06, 2017

a sew together bag for my neighbor

My neighbor had a birthday this week, so I made her a sew together bag. (Pattern is available here.) These bags are NOT a quick project, so one has to choose the recipients carefully. My kids joke that they know I really like someone if I go to the trouble of making one of these as a gift. (They are totally right about that!)
I always struggle with picking out fabrics for a gift. I know what I like, but I have a hard time deviating from that. For this one, though, I knew that she would like something bright and cheery and cute, which is pretty much in my wheelhouse. Hurray for that!
I used 4 different fabrics for the pockets and 3 different fabrics for the pocket linings. What can I say? I like to use as many fabric as I can. Haha! I knew that she likes pink, so that was helpful for determining the pocket fabrics. The rest of the fabric selections were determined by the zippers I had on hand. (True story!)
 
Oh! I should also mention, I added tabs to the zipper ends, which helps immensely in assembly. (I have a post that explains the modifications here.)
Even though it takes more time, I like to make a patchwork panel for the outside and then quilt it. I start with 2 1/2" squares, so they finish at 2". (The side ones and the top ones get trimmed slightly, but it still works!)
I believe that this is my 6th sew together bag that I've made to date. I gave it to my neighbor today and I'm happy to report that she was OVERJOYED with her gift. That makes every stitch worth it!

Friday, December 01, 2017

almost finished and some wool garland

Welcome to finish it up Friday and Happy December!
I made serious progress on my gingham quilt this week! I debated rushing through the hand binding just so I could have a finish for today, but then the voice of good reason showed up. (Hurray for that! hahaha!) I decided to slow down and enjoy the process instead. I'm currently 1/4 of the way done stitching the binding to the back. I look forward to snuggling up with it as I finish it this weekend. I love hand binding!
 
(As an aside....I dream of having a stack of 20 quilts sitting in a pile, just waiting to be hand bound, especially as we head into winter. I don't think that will ever happen, as I can't wait to finish quilts! But, doesn't it sound like a nice winter activity to sit down after dinner and have some binding to do every night?? I don't think that would ever get old!)
 
Anyway.....I do have a small finished project to share with you today!
A few years ago my neighbor friend passed along some scraps that her sister-in-law had leftover from making felted wool mittens. Not one to turn down scraps, I adopted them and they sat in my sewing room for quite awhile. I cut circles (freehand, with scissors) out of the wool scraps and they sat in a basket for awhile longer.
Recently, I separated the cool colors from the warm colors and sewed some of them into a garland. It was so quick and easy...once the circles were cut, that is! I used a 50 weight thread from Connecting Threads (because it's nice and thick) and I stitched them together on my sewing machine. I sewed about 6 "blank" stitches between each wool disk. I made a few garlands...one is about 4 yards and one is 4 1/2 yards long. I discovered that might have been a little bit too long, but I guess I can always trim them, right?
I hung one on my mantle and I'm sure I'll find a home for the other one soon. This was such a fun and quick project!
These are ready to stitch up and would be perfect for either Christmas or Valentine's Day. Or both! 

That's it for me today! Do you have a finish to share? If so, please link up. Thank you, as always, for joining me for finish it up Friday! Thanks for stopping by and for reading. I appreciate it so much! Have a great weekend!


Monday, November 27, 2017

on to the next!

Thank you so much for all of the lovely comments on Curt's quilt. I appreciate each and every one!

It felt great to focus on just one project and make significant progress in such a short time. Since I was on a roll, I decided to move on to the next! I had 4 quilt tops to choose from, so it was time.
I took advantage of the lovely weather this weekend and I basted this king size gingham quilt on my 3 season porch. It was helpful to have other people home so that they could help keep the puppies occupied, too. It took me nearly all day to piece the backing (all 9 1/2 yards of it!), trim the threads on the backside of the quilt top and pin the layers together. It took nearly all the floor space I had available. Oh, boy!
I've been debating between sending it out to my long arm quilter and quilting it myself for the past few months. Sure, it would have been easier to send it out....especially since the quilt measures 108" x 102". But, there is something kind of neat about quilting such a massive quilt yourself on a domestic sewing machine. (Maybe I have more stubbornness than good sense? Hahaha!) I definitely maxed out the throat space while quilting it, but really, it wasn't terrible. No more than 1/2 of the bulk needs to be in the throat at any one time. I will say, though, that it takes a lot of adjusting and readjusting of the quilt. A LOT!
Here's a photo of my quilting set up. I have a decent amount of table space to hold the bulk of the quilt behind the machine, and equally helpful is my ironing table to the left of my chair, which supports the rest of the bulk.
The loops certainly aren't perfect, and I've had to work on letting go of perfection as I quilt. (The struggle is real!) I've estimated that it will take me about 16 hours (!!!) to quilt it. Despite that, I'm still glad that I decided to quilt it myself.

I've got 17/50 lines of loops left to quilt, so I can see the light at the end of the tunnel. That certainly helps, too!

Happy Monday to you!

Friday, November 24, 2017

moody quilt complete!

Welcome to finish it up Friday! I hope all of you in the U.S. had a Happy Thanksgiving!
Much to my surprise and delight, I was able to finish the moody quilt this week! Woohoo! It's amazing what a deadline (self-proclaimed or not) will do. Hahaha! I finished the quilt at 12:15am on Thanksgiving day. I gave it to my brother in law to sleep under that same night (morning, actually...) which was a was a LOT of fun! He was surprised!
The pattern is called chain of diamonds from the book No Scrap Left Behind. I enlarged the blocks so they finish at 4" rather than 2" as shown in the book. The quilt uses chambray, linen, denim, and the like for the chains and Kona shadow for the background. I love the combination and how masculine the quilt turned out.
For the backing I used Kona solid in the color overcast (I love that name!) along with a strip of scraps leftover from the front. I do love a pieced quilt back!
I auditioned several fabrics for the binding, but landed on this stripe from my good neighbors collection. (It's out of print, I'm sad to say.) I love that a little bit of my own fabric made it's way into the quilt.
It really is the perfect binding fabric! Look at how well it ties the front and the back together. I designed the stripes with binding in mind, so using them for that reason (again) was delightful. I machine bound it (using this tutorial) for a quick and sturdy finish.
I quilted it on my Janome Horizon with straight lines. Nothing fancy needed! The quilt measures about 64" x 84".
Some of you requested it, so here is a quick picture that I snapped of Curt with his quilt. I know that he likes it a lot! Hurray for a happy finish.

Now it's your turn! Please link up your finishes for the week. Thank you for joining me for finish it up Friday! Thank you for stopping by and for reading. It means a lot! Happy Friday to you!

Tuesday, November 21, 2017

change of plans

Last weekend, as I was working on a quilt back for my mostly moody quilt, it occurred to me that if I hadn't put the yellow pieces into the quilt top, it would be the absolutely perfect quilt to give to one of my brother in laws. He has been hinting (not so subtly) over the years that he would like a quilt, so it's been on my list, but it just never made it to the top! He's planning on visiting for Thanksgiving, so I figured the timing couldn't be better.
I started by doing quilt surgery. I ripped out all the mustard pieces and decided that I would sew in the replacement pieces with partial seams. It sounded like a good plan, but since the pieces were wonky to begin with, it was quite challenging! Nothing like seeing 21 holes in your quilt top to invite a little panic. Ha!
I persevered and I eventually got the quilt top sewn back together. I felt much better once the quilt top was complete. (Again.)
THEN, I decided that I needed to add a few more rows to the length of the quilt. Now it measures 64" x 84"....not quite a twin size quilt, but a decent lap size. I'm so glad that I went to the trouble to alter the quilt. I love it and I think my brother in law will, too. It will be nice to have this quilt go to a good home rather than adding it to the finished pile. (What a concept, huh? Ha!)
Instead of cleaning, cooking or preparing for the house full of people that will be arriving in a few days, I pieced a quilt back and basted it this morning before the crazy begins. Nothing like a deadline to get things done, right?

The quilt pattern is based on my chain of diamonds quilt, from the book No Scrap Left Behind.
Background color is Kona Shadow. Scraps are various chambray, linen and denim fabrics. Each block finishes at 4" square.