Monday, September 29, 2008

plain spoken, again


I finished another plain spoken quilt. I adore this pattern. This quilt was part of baby quilt week, but it is actually more like a lap size-it measures 46" x 56". The pattern is from The Modern Quilt Workshop.

The backing fabric is decorator weight. I picked up this stuff for $1.29 a yard! It's extra wide, so no piecing was required. It also makes the quilt heavier, which I like.

I went through the trouble of making bias binding, which was totally worth it. I love that detail on this quilt.

My intent of baby quilt week was to make quilts for charity. I'm not doing so well with that...I doubt I will be able to give this one up. I love this quilt, but my daughter really doesn't need 6 quilts in her room, so I'm torn. Either way, though, it does feel good to have it finished, because my "in progress" list was beginning to scare me.

Saturday, September 27, 2008

summer sunrise quilt

The super simple quilt from baby quilt week is done. I absolutely love this one. The quilting really shines because of the simplicity of the design. The binding pops. The texture is spot on-full of crinkly goodness.

As you can see in this photo, I have some work to do with squaring up my quilts before binding. Aw, well. I'm a firm believer that wonky is good.
The quilt measures 40" x 49".

Thanks to Josie who commented that it looks like a summer sunrise, thus naming this quilt for me. Hope you don't mind, Josie.

Thursday, September 25, 2008

fabric basket


Pink Penguin has a wonderful tutorial for a fabric and linen basket here. Isn't it the cutest?
I sewed this little one up this morning. It's a fun and easy project that uses small scraps-just 2" cut. That's my kind of project! I'm afraid to tell you that these are addictive, too. I am thinking about making one in each color to hold my smaller fabric scraps. Color coded little scrap baskets....how fun would that be?

Oh, and these would make a great gift, too. That is if you could part with it.

Wednesday, September 24, 2008

the un-paper bag a la amandajean


The Purl Bee has a great tutorial for a bag they call the un-paper bag. I made one several months ago from green linen. I love it and I use it a lot. Unfortunately, it isn't photogenic. It's a perfect size to use as a purse that has enough room for a few extras, like a few library books or a diaper, wipes and a sippy cup. I decided that it was high time to make a patchwork one.

(this is the reverse side)

I used the remaining charm squares I had from the Moda Daydreams line. I trimmed them down to 4.5". I now officially LOVE charm packs. They are so handy!
I had two extra squares, so I added them to the handles.
I quilted each square with matching thread....
and added a ric rac bordered pocket. Well, two pockets, actually. This may be my favorite part of the bag. I also officially love ric rac, too. I need to stock up.

For the handles, I cut 2 pieces 4" x 20" and them made them as directed in this tutorial.

One thing I learned....when using the template plastic for the bottom, round the corners, otherwise it will wear through the corners of your fabric, and quick.

This project, since it was pieced and quilted, took awhile, but still well worth it. Next time I am going to try it with decorator fabric.

Monday, September 22, 2008

baby log cabin quilt


I'm not normally one to hang quilts on the wall, but after finishing this baby log cabin quilt a few weeks ago, I discovered that it fit perfectly in my daughter's room. I couldn't resist.

My husband hung up the pottery barn inspired shelf that I made years ago beneath it, which is a lovely place to have Milly and Melvin sit. (Thankfully, I finally got those two clothed!)

here's a close up of one of the quilt blocks....
(the white on white polka dot came from the very generous Marcia...I love that fabric.)

the backing/binding...

and all together it creates a cozy little reading nook for my daughter. After nearly a year in this house, I am finally decorating. Ya-hoo!

There is a tutorial here for the log cabin blocks.

Check out the beautiful one that Jane made using the same pattern.

Saturday, September 20, 2008

Star Wars robe


My boys are a little obsessed with Star Wars. Last January, when we went to Disney World, we went to the Jedi Training Academy. My boys were thrilled to see the characters in person. They didn't get chosen to participate in the training exercise, much to their disappointment, but I did promise them that I would make them some robes when we got back. It's 8 months later and I finally made good on my promise. Well, I'm half way there. One robe sewn and one to go.

I used brown cotton solid from JoAnn's.

and Simplicity 3575 for a pattern.
I omitted the tie around the waist.

I started last night (with a little help via phone from my expert seamstress friend Linda)...

and I came up with this. He was so very excited. (And I was, too, actually.) He was walking around in character this morning. When I asked him to put some things away, he grabbed the items, bowed to me and walked away silently. It was so funny.

I'm not a fan of patterns, but this one was pretty easy. One thing though, sewing a 5/8" seam allowance was a trip after sewing 1/4" seams for years.

Although this isn't a tutorial, this is the best Christmas gift idea I have for boys, for those of you who asked. It would work great for Halloween, too.

Thursday, September 18, 2008

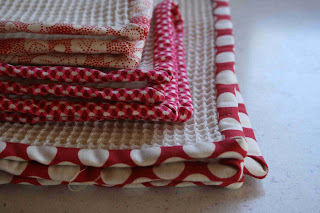
dish towels & cloths


I happened upon this little project quite by accident. I found some waffle weave muslin at JoAnn's in the remnant bin and I chucked it into my cart thinking I could use it for something.
I'm so glad that I did! It works perfectly for dish towels and dish cloths.

For a dish cloth:

cut one piece of waffle weave muslin 10" square

cut a piece of fabric (plain old cotton) 2.5" x width of fabric (42")

fold in half lengthwise and iron
this will be used for binding

using a walking foot, attach the binding to the square as you would quilt binding

it should look something like this

hand stitch the binding to the back and you are done!

for the dishtowel, use the same technique but cut a rectangle 17" x 21" from the waffle weave muslin and cut 2 strips of binding fabric instead of one

a few things about this project:

I am not a pre-washer, normally. I did pre-wash the muslin, but I let it air dry. After I used the towel, I washed it and then dried it in the dryer. It shrunk quite a bit. The yellow one was washed and dried. The red one is the original size.

I was surprised that it shrunk so much. So, my word of advice is to wash AND dry the fabric in the dryer before cutting the muslin. I did not pre-wash my binding strips.

And one more thing...if you have an aversion to binding, (I do not) this project is not for you.

I can see doing a whole stack of these for a stand-by gift, because everyone needs dish towels. And if you need dish towels, why not make them pretty, right? And how cute would it be to make some of these for each season?

I am planning to make many, many more of these. Lucky for me, I like binding. :)

Wednesday, September 17, 2008

virtual quilting bee and a call for ideas


The quilt block shown above is for the Virtual Quilting Bee. This one is for Melissa. Yesterday I googled how to make flying geese and I came across this fabulous tutorial. I don't have the ruler, but I didn't really need it. This technique made flying geese construction so very easy. I'm completely hooked. I am planning to start a new spectrum quilt of sorts...one inspired by this masterpiece...using my stash. You know, in my spare time. (Ha!) I don't know how far I will get with it. I'd really love to make a king sized quilt like this, but I will be happy if it only ends up being a baby size. A big thank you to moving hands for posting such inspiring quilts year after year for all of us to see, since it is highly doubtful that I will ever make it to Tokyo for the International Quilt Festival in my lifetime.

----

I couldn't decide for the life of me which tutorial to do next for my series. I have several ideas, but nothing that I was super excited to work on today, you know? I plan to come up with the tutorials that have been requested, like a Christmas tree skirt and Christmas stockings, but I am still working on formulating the designs for those. And they will take a little time. Anything else you would like to see tutorial wise? I'm not making any promises, but I'd love to hear your ideas.

Monday, September 15, 2008

vinyl front zipper pouch

Today's project involves more clear vinyl. Hurray!
You will need:
2 pieces of fabric that is lined with interfacing that measure 8" x 5.5"
one piece of heavy weight vinyl that measures 8" x 5.5"
one 7" zipper
and one piece of fabric that is cut 2.5" x 22" fold in half lengthwise and press. (this is your binding strip.)
take the 2 pieces of fabric, place your zipper in between and pin zipper in place
using a zipper foot, sew a seam the length of the fabric
finger press the fabric
top stitch (I used a regular 1/4" foot here)
using a 1/4" foot, sew the vinyl to the other side of the zipper
fold the seam under the zipper and top stitch (the vinyl is on the right hand side in this photo)
your first line of stitching will be hidden under the zipper
doesn't that look oh-so-tidy?
trim the sides a bit to make all the layers even, if necessary
now the vinyl should match the size of the backing exactly
since you can't use pins on vinyl, I used binder clips to hold the layers in place
they work like a charm
take the binding strip and place it about an inch above the top of the zipper
starting at the top of the zipper, sew the binding strip to the zip pouch. I used a walking foot for this step. Stop sewing a 1/4" from the bottom. Remove the piece from your machine.
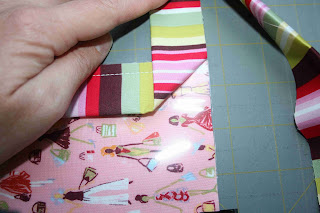
to get a perfect corner, flip the binding strip up,


and then fold it down over itself.
start stitching 1/4" from the top and sew until you get to 1/4" from the bottom
turn the corner the same way as before
let the binding strip extend above the pouch an inch
tuck in the top raw edge (trim a bit if necessary)
and hand stitch the binding down
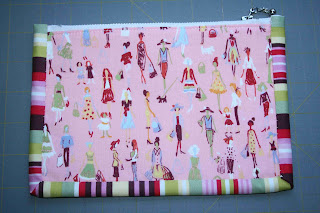
here is the front
and the back
and in use.
Isn't that great? I really, really like this project!!! I have one that I have been using for my daughter's hair bands and I love being able to see the contents. I also like the binding strip around the edges.
If you make a vinyl front zip pouch using this tutorial, I'd love to see it.