

You will need:
2 pieces of fabric that is lined with interfacing that measure 8" x 5.5"
one piece of heavy weight vinyl that measures 8" x 5.5"
one 7" zipper
and one piece of fabric that is cut 2.5" x 22" fold in half lengthwise and press. (this is your binding strip.)


take the 2 pieces of fabric, place your zipper in between and pin zipper in place

using a zipper foot, sew a seam the length of the fabric

finger press the fabric

top stitch (I used a regular 1/4" foot here)


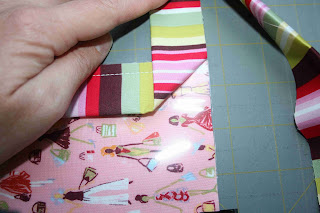
using a 1/4" foot, sew the vinyl to the other side of the zipper


fold the seam under the zipper and top stitch (the vinyl is on the right hand side in this photo)
your first line of stitching will be hidden under the zipper


doesn't that look oh-so-tidy?


trim the sides a bit to make all the layers even, if necessary


now the vinyl should match the size of the backing exactly

since you can't use pins on vinyl, I used binder clips to hold the layers in place
they work like a charm
take the binding strip and place it about an inch above the top of the zipper


starting at the top of the zipper, sew the binding strip to the zip pouch. I used a walking foot for this step. Stop sewing a 1/4" from the bottom. Remove the piece from your machine.


to get a perfect corner, flip the binding strip up,

and then fold it down over itself.


and then fold it down over itself.
start stitching 1/4" from the top and sew until you get to 1/4" from the bottom
turn the corner the same way as before

let the binding strip extend above the pouch an inch


tuck in the top raw edge (trim a bit if necessary)
and hand stitch the binding down


here is the front
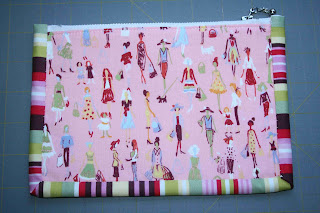

and the back


and in use.
Isn't that great? I really, really like this project!!! I have one that I have been using for my daughter's hair bands and I love being able to see the contents. I also like the binding strip around the edges.
If you make a vinyl front zip pouch using this tutorial, I'd love to see it.
That is so cool! I just love the pouch! What a great idea with the vinyl. I actually have some vinyl, maybe I will get it out and use it to make the pouch.
ReplyDeleteOh wow. I'd have never ever thought of that. It would make a fabulous make-up bag. ANd it looks sooo easy. I've gotta try it.
ReplyDeleteAmandaJean,
ReplyDeleteThis is totally cute. Love the see through pocket and that fashionista fabric is the cutest!
Very cute! I can see all sorts of uses for these in my travel bag! Now to get some clear vinyl.
ReplyDeleteThank you!!
Okay...my list of projects to try is growing and growing...and my list is full of projects from your posts! Thanks again!
ReplyDeleteI have no vinyl but I need some now! My girls would find all sorts of reasons to use these :)
ReplyDeleteSo Cool. Love the print.
ReplyDeletecute idea!!
ReplyDeleteWe are sure enjoying your ideas. and we're wondering?~~do you have any cute Christmas Tree Skirts? My daughter is interested in making one this year. (they are young and kind of newly married)
ReplyDeleteT-O-O C-U-T-E!!! Great idea;)
ReplyDeletesuper cute!
ReplyDeleteThanks for showing how to do the zipper. I wish I could find the time to make all of these projects.
Very Cute!!!!
ReplyDeleteDon't give up on me. I really want to try all these tutorials but the garden is just keeping me too busy! It is slowing down so maybe soon I will be joining you.
ReplyDeleteWow, I am just loving all of your projects! I just discovered your blog recently, and now it's my daily addiction. I am developing quite a loooong list of projects to be completed. Thank you for all of the time and effort you put into your blog!
ReplyDeleteYour tutorials are amazing Crazy Mom -- how on earth are you getting all the time for all these projects???
ReplyDeleteAnother awesome tutorial! This one is definitely going on the to-make list. Thanks so much! :)
ReplyDeleteLove the pouch! I have a ton of vinyl from some previous projects (can't recall what they were now!) This is an amazing way to use it up!!
ReplyDeleteThis is a great tut. I have a tip for cheap vinyl!
ReplyDeleteGet a clear shower curtain from the $1 store. It's usually very sturdy and you can't beat a buck for yards and yards!
This was a great idea. i have used some vinyl earlier, but find it a bit difficult to handle with. i will try this one. Thank you.
ReplyDeleteGreat Idea, will do it!! thanks.
ReplyDeleteOh, what a great idea!
ReplyDeleteVery cute. Great tute!
ReplyDeletelove this tutorial! this will be great for a make up bag!
ReplyDeleteCool!!! I love this!
ReplyDeleteThis is fantastic! I just love your blog and will be linking to you later today!
ReplyDeleteOooooohh! Love!!
ReplyDeleteIf I just didn't make zippered pouches for all my teacher-, sister-, friend-, family-gifts last year for Christmas, I'd make those! I guess it won't stop me from making a few for myself. (And gives me another reason to use my walking foot.)
A fun project. I made Cathy a zipper pouch without vinyl for her birthday.
ReplyDeleteso cute! Lovely fabrics.
ReplyDeleteYour tutorials are just awesome! Thank you :)
These are great tutorials! I love this pouch...it'd make an excellent gift!
ReplyDeleteI have really enjoyed all of these tutorials and you've certainly inspired me lately! Thanks!
ReplyDeleteRegina
very cool! This would be perfect for my younger sister :)
ReplyDeleteAnother fabulous tutorial, Amanda!!! Thank you so much. I could see this in my suitcase for lots of little items--and maybe airport security wouldn't have to tear up the suitcase so much!!!
ReplyDeleteFirst you amazed me with the quilts and how quickly you get them finished, then it was the boxes (awesome storage) and now the vinyl holder. I'm seeing Christmas...although I SWORE off making any Christmas gifts a couple years ago! Thank you for sharing your gift the tutorials are very easy to follow.
ReplyDeleteThanks so much for the how-to.
ReplyDeleteHow sweet to share.
Another great tutorial, Amandajean! Thank you for all your beautiful and inspiring ideas.
ReplyDeleteI knew that when I finally got my rear back in blog gear that you'd have some awesome tutorials here. And of course, you didn't disappoint. My niece would love this. I could throw in a Lip Smacker (do they still make those?) and she'd be in heaven.
ReplyDeleteI made 8 pouches for Christmas and have a few zippers waiting at home for another project. I used a shower curtain but I may want something heavier for the next project. I'll see how the current pouches hold up with the kids! Here's the link:
ReplyDeletehttp://luckeyone.blogspot.com/2009/01/sewing-review.html
I think this would be awesome if you doubled the vinyl at the front and sandwiched glitter between the two before finishing it up! It would give it a little extra sass!
ReplyDeleteI love this tutorial! I'm totally addicted to your ideas (as I am absolutely vacant of my own--I just like to execute other people's great ideas!LOL!).
Thanks
Realy great! I´ll try to make it, thank you soooo much.
ReplyDeleteWow! What a great idea! Thanks for the tute!
ReplyDeleteLovely tutorial! Would you like to be my neightbor so we can stitch togheter with some coffe or "mate"? Little problem ... I live in Buenos Aires!! LOL
ReplyDeleteMarina
I MADE ONE!!! They are SO cute!! Thanks for the GREAT tutorial!!! xox Here is the link...
ReplyDeletehttp://myquiltdiet.blogspot.com/2012/04/dreaming-of-zippered-pouches.html
Thank you for this fantastic tutorial! I love to see the contents of my bag, which is why I often pack my toiletries in ziplock bags when I travel, but heck, they're so ugly! This is a great solution.
ReplyDelete