Pages

Wednesday, September 26, 2018

broken dishes-a completed quilt

I've finished my broken dishes quilt! I started this at retreat in July, and here it is, end of September, complete. That feels great! All fabrics came from my stash, which feels even better!
 
This quilt is based on my Myrtle's Broken Dishes pattern, but this time I made 20 blocks rather than 12 and I skipped the borders. SO many half-square triangles in this quilt, but aren't they striking with the light background?

The background print is called "bedsheets" in the color butter, from my Emma & Myrtle fabric line for Connecting Threads. I did an all over "cinnamon roll" quilting pattern freehand on the baby lock Tiara that I currently have on loan. The quilting took a considerable amount of time (and concentration!), but I think it was worth it. After I got done quilting it, I thought, "I'm finally in the groove. I wish I had another quilt to quilt right away!" How crazy is that?
 
For the backing I used the red apron print, also from my Emma & Myrtle collection. I have to admit, it's pretty fun to back a quilt with fabric that you've designed! The red gingham binding is SUCH a happy finishing touch, isn't it? Initially I was worried that it would feel too light or too cutesy compared to the rest of the quilt, but man, I love it sooooo much!

The fabrics used for the quilt were bundles from Westwood Acres "I Want Her Stash Club" from a few years ago. They were curated by my friend Amy Smart and Denyse Schmidt. It was great to combine the two AND it was also a fun exercise to work with bundles selected by someone else. I would recommend it! :)

The quilt measures about 72" x 90", so a generous twin size. I'm very pleased with how it turned out.  It actually has a lovely fall feel to it, doesn't it? Now I'm excited to wash it up so it gets that fantastic crinkle. I think I'll sleep under this one tonight!

This is my 11th quilt finish for the year!

Monday, September 24, 2018

black licorice-a work in progress

I've been working on this quilt off and on for quite awhile now. I considered giving it up for adoption a few times, but I decided to see it through to completion. It's tricky to push yourself out of your comfort zone but still like the project you are working on, but I think I've finally gotten to that point with this quilt. Hurray! My daughter LOVES this quilt, so she will be the recipient. I'm pretty sure that she loves color even more than I do, which is hard to imagine. :)
I'm using a variety of solids, all from the scrap bin. Each block is cut at 2" x 2 1/2" and finishes at 1 1/2" x 2". No strip piecing here, since it's all scraps. The black fabric is a combination of leftover Moda bella jelly roll strips and black Kona cotton. The pieces are a lot smaller than I bargained for, but even still, I'm aiming for a 60" x 72" quilt. I'm finally half way there, which is pretty exciting!
 
This quilt is a part of my salute to solids personal challenge that I started last year at this time. (You can read more about it here.)
 
Happy Monday to you!

Thursday, September 20, 2018

workshop totes

My friend Jeni hosted a workshop sew along a few weeks ago and I waited until the very last day (in my usual fashion!) to join in. The workshop tote pattern (available here) is straightforward and fun to sew, with a few different options. You can use one fabric, as I did here. You can also use patchwork squares or half-square triangles. (Directions are included in the pattern for all three.) I LOVED making this tote. I gave it to my sister for her birthday a few weeks ago. She plans to use it for her trips to the library with her boys. Hurray for useful gifts!
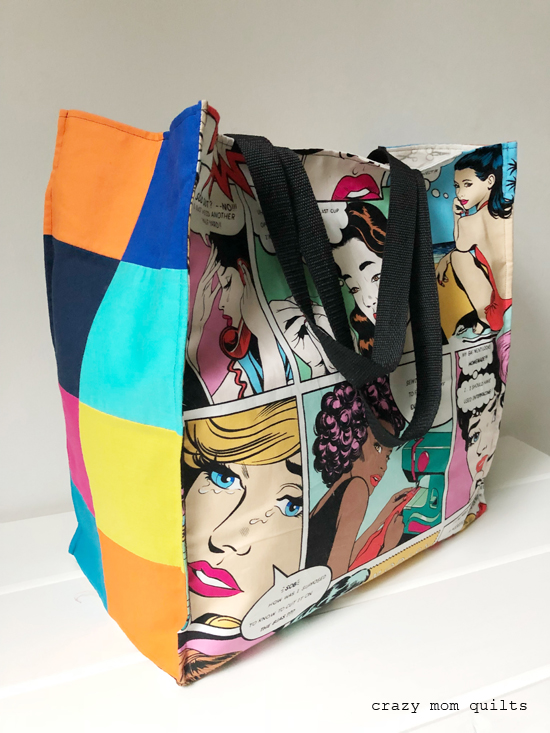
I have a few workshop totes that I love and use, too. This one was made by my friend Cindy. She used this fun focus fabric for the exterior. (I believe it's called sewing woes by Alexander Henry). It's so funny and perfect for this bag.
She didn't have enough of the focus fabric, so she used some solid colored charm squares to fill in the sides. Isn't that perfect? I love how it turned out and how making do can be a benefit at times.
Here is a half-square triangle version that my friend brianne made for me last summer. I love the black and white paired with the hot pink and orange lining. It's a great combination of her taste and mine. I have used this tote quite a bit and it's holding up quite nicely. It's such a fabulous size for many different uses.

One of my favorite features of this bag is the top stitching on the sides to give the totes structure. Genius! I also love how different each bag looks based on the fabric selection. The possibilities are endless!

Monday, September 17, 2018

retreat gifts, part 2

Thanks so much for sharing your ideas for "happies" in the last post. It was fun to read your comments. I've added a few new ideas to my list!
 
Of course pincushions are the number one on my list of things to make for retreat gifts. I have a few batches of them to share today!
In early August, I attended another annual quilt retreat with some of my quilting friends. I've been a part of that group for a few years now, so I'm finally catching on to each of their personal tastes. (It takes me awhile!) This year I made a paper pieced pineapple pincushion for each of them in colors that I thought they would like. (The pattern is in Plenty of Pincushions, Volume 1, which is available here.) Lots more assembly line sewing, but once I hunkered down, it wasn't so bad.
Each of the pincushions were heavily quilted, so I piggy backed them through my machine during the quilting process and it went pretty quick! Again, I love seeing multiple items grouped all together.  
A few weeks ago I was playing in my sewing room and I came across the scrap vortex blocks that I started on the 100 day project. I didn't do so well on the 100 day challenge, but that's ok! I turned a bunch of the blocks into pincushions in one afternoon. It was nice that the patchwork had already been made! I added a tab to each pincushion to "up" the cuteness factor.
I took these to a retreat that I taught at over the weekend and I let each student pick one of their choice. It's so fun to share things like this with other quilters and to release the pincushions out into the world as little bits of happy. It never gets old!
-----
Here is a rundown of my pincushion method in a nutshell (no pun intended!):

Each pincushion top is a little bit of patchwork that has been quilted onto a batting scrap. The backings are quilting cotton interfaced with SF 101 for a bit of extra stability. They are filled with crushed walnut shells, which is sold in pet stores as lizard litter. I hand stitch the openings closed with invisible nylon thread, so the stitches aren't visible.

I find that this combination produces a lovely finish for a pincushion. (I think it's safe to say that I've done sufficient testing. Hahaha!)
-----
Happy Monday to you!

Thursday, September 13, 2018

retreat gifts, part 1

Every year at my Gruber's retreat we exchange "happies". This year I made 11 (!!!) zipper pouches to share with my friends. (Included in that total: I made one to keep, plus another one for my friend/neighbor, AND I made one that was an inch too short, due to a cutting error. Hahaha! Although it wasn't funny at the time....)
I also spray painted the handles of these bow scissors, which I purchased at Harbor Freight. (I included a pair in each zip pouch.) I can't take credit for the cute scissor idea...I saw it on Instagram. (I used masking tape to cover the blades, then I used a generous layer of spray primer and a few layers of spray paint on the handles only. Once the paint is completely dry, remove the masking tape. From my experience, glossy paint works better than a matte finish. The glossy paint didn't ding up, but the matte paint did.)
 
The measurements are very similar to my two colored zip pouch pattern (available here). In this version I used one fabric for the outsides (obviously), but I made it slightly oversized and I quilted it. After I quilting, I trimmed the panels down to the correct size. This is a great way to use up batting scraps!  I used a layer of SF101 in addition to the batting, for added structure. I purchased the metal zippers from Zipit on Etsy.

Although assembly line sewing isn't my favorite, it was fun to see all the pouches together and it was fun to share them with my friends!

What are some of your go to gifts to give at retreat? What are some of your favorite things that you've received? (I'm always in the market for new ideas.)

Tuesday, September 11, 2018

lost in the crowd-a long work in progress

This morning I spent several hours cutting in an attempt to bring some order to the scrap chaos that is currently in my sewing room. My main objective was to cut 1 1/2" squares for my lost in the crowd quilt...but I ended up cutting up some other size scraps, too. There are some 2 1/2" squares, some 2" squares and some 2" x 2 1/2" rectangles. I have a goal to SAVE nothing smaller than a 1 1/2" square, but if you look at the photo above, you can see that I'm not quite there yet. Those little random bits in the top of the photo are keepers....
I did some sewing, too! I was able to add 25 new blocks to my total. It doesn't take long once the scraps are cut.
 
Earlier in the summer I hit the half-way mark....shown above are 600 little bitty blocks! I'm so glad that I decided to package them up into baggies of 100. It's kept the blocks orderly and makes the entire quilt seem attainable. (Hurray!) You can see the original quilt inspiration here.
It seems like every time I post about this quilt, there are questions about how I press the blocks. The beauty of this quilt is that there will be a plain 2 1/2" alternating square between each patchwork square, so the seams won't need to nest. That's one of the reasons why I took on this project...it's not fussy. I press to the dark when sewing two squares together, then I press the middle seam open because it helps distribute the bulk nicely. It's been working out great for me.

I only have 575 more blocks to make! Hahahaha!

Friday, September 07, 2018

need more coffee-a completed quilt

Welcome to finish it up Friday!
I recently finished this quilt that I'm calling "need more coffee". It's a spin on my mini coffee cups quilt....but I made a LOT more blocks this time. 110 blocks, to be exact. I was working on these blocks at my annual Gruber's retreat this past summer and my friends urged me to offset the rows of coffee cups rather than rely on a straight block setting. It was definitely the right choice! That little change made a big difference.
I used a variety of light prints for the background, but all of the coffee cups are RED!
I used the spool print from my Emma & Myrtle collection for the backing and a sweet gingham print for the binding. (The binding might be my favorite part of this quilt!!!)
I glue basted the fabric to help line up the repeat of the print for the backing. It takes a little bit extra time to do it, but the satisfaction that I get out of it is priceless. I know, I'm such a nerd!
I quilted it on my Janome Horizon. The original quilting plan was to quilt a 1/2" grid all over, but I came to my senses and settled for a 1" grid instead. I decided that it'll do. Hahahaha!
 
The quilt measures about 60" x 76".
 
As much as I LOVE this quilt, I think I'm going to give it as a gift. I can't keep them all....sigh.

Now, it's your turn! Please link up your finishes. Thanks, as always, for joining me for finish it up Friday! Have a great weekend!

Wednesday, September 05, 2018

progress on the broken dishes quilt

Last Friday evening I finished assembling my broken dishes quilt top. The blocks finish at 18", so the assembly went relatively quickly, even though I do pin at each intersection. Measuring 72" x 90", it's a generous twin size. (It's based on this quilt pattern, but this time I made 20 blocks rather than 12 and I skipped the borders.) This is a good stash buster!  
Yesterday I spent several hours prepping the quilt for quilting. It's just like painting....doing good prep work in the beginning pays off in the end. I used spray baste (on the top layer only) to keep things nice and flat. Then I used pins to hold all three layers together. Spray baste isn't my preferred method because it's messy, sticky and smelly, but I wanted extra insurance to avoid the layers shifting. I think it's going to work well!
Inspired by my friend Stephanie, who has been working very hard to learn and up her machine quilting skills, I decided to push myself out of my comfort zone, too. Rather than default to my loop de loop quilting, I'm doing some "cinnamon roll quilting", as I like to call it, instead. I've done this on parts of other quilts before, and on a mini quilt, but it's a big commitment on a twin size quilt. I'm taking a lot of deep breaths and forcing myself to slow down and let go of perfection. (Always a struggle...) I'm already looking forward to the crinkle that this one will have after it's washed! It feels good to be stepping out of my comfort zone...kind of. Hahahaha!

Because it's always fun to hear from you....what is your "go to" quilting design? What is one quilting design that you would LIKE to be good at? I'd love to hear your thoughts!