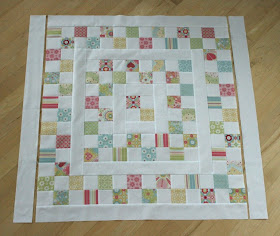
For this week we will be adding another ring of squares to the quilt center.
Make 2 strips 28 segments long, add to the top and bottom of the quilt.
Make 2 strips 32 segments long, add to the sides of the quilt.
Step back and admire your handiwork!
(I can't believe I actually got this to stay up on my design wall.)If you are making a queen or king size (gulp!), keep adding additional rows of squares and sashing strips until you have your desired quilt size. (In other words, you are on your own now...sorry!) If you are following the twin size directions, that's where we stop for today. We have a few more rows to add to the top and bottom, but the center is complete. Yipee!
Last week a few of you mentioned that you were experiencing the same problems as I was with the strips being too long for the quilt top. My rows this week are worse than last week. Ugh. So, after easing everything in, I had some pretty wavy edges. Some sides were worse than others.
On the sides that were really bad, I went through on every other seam of the outside edge and sewed the seams at a bit of an angle in order to reduce some waves. I took a photo to show what I mean. (double click on the photo to enlarge it.)

The dotted line was my original seam line.

The dotted line was my original seam line.
The solid line is my new seam line.
I think the key here is to be subtle. Make sure you angle the new seam and that it meets the original seam or you will have some nasty tucks. It's not ideal, but it's one way to make your quilt lay a little bit flatter. Oh, you will want to press your seams again after this step.
Don't forget to add your progress shots to the flickr group.
Happy Monday to you!


